No Bake Biscoff Cheesecake
When creamy meets crunch- this no bake biscoff cheesecake happens! Get ready for silky filling, buttery crust, and rich, caramel cookie flavor in every bite.
Ingredients
For Crust
- 14-15 Lotus Biscoff Cookies
- 4 tbsp / 60 ml Melted Butter
For Cheesecake Filling
- 1 and ⅓ cups / 320 g Cream Cheese
- ¼ cup / 30 g Powdered Sugar
- ½ cup / 118 g Biscoff Cookie Butter
- 1 cup / 237 ml Heavy Cream
- 1 tsp / 5 ml Vanilla Essence
- ½ cup / 118 g Melted Biscoff Cookie Butter
Instructions
Prepare The Crust
- Add the biscoff cookies to a food processor and pulse until fine crumbs form.
- Pour the melted butter over the crumbs and mix with a spatula until combined.
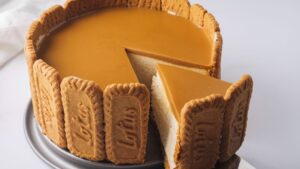
- Grab a 7-inch springform pan and line the sides with whole biscoff cookies.
- Pour the crumb mixture into the pan and use the back of a glass or spatula to press it down firmly.
- Place the pan in the refrigerator for 15 minutes to set.
Make The Cheesecake Filling
- In a large mixing bowl, add cream cheese, powdered sugar, and Biscoff cookie butter.
- Use an electric mixer to beat until smooth and creamy.
- Add heavy cream and vanilla essence to the mix and beat again until thickened.
Assemble and Chill The Cheesecake
- Take the chilled crust out of the fridge and pour the cheesecake filling over it.
- Use a spatula to smooth the top evenly and gently tap to remove any air bubbles.
- Cover and refrigerate the cheesecake overnight or at least for 6 hours.
Add Topping, Serve, and Enjoy!
- Pour the melted biscoff cookie butter over the cheesecake and spread it evenly.
- Refrigerate again for at least 30 minutes or until the topping is set.
- Release the springform pan and slice into the rich, creamy layers of your easy and delicious no-bake biscoff cheesecake!